
Ultimate Content Workflow | Write Epic Blogs
If you’ve ever sat down to write a blog post at 9:00 PM, opened a Google Doc or MS Word, and proceeded to spend two hours researching “how many types of cheese exist in France” instead of actually writing, welcome home. You are my people.
For the longest time, my “process” was basically fueled by caffeine and panic. But here’s the truth: whether you’re a hobbyist or a pro, a solid content writing workflow is the difference between a successful blog and a very expensive diary. We’re going to trade the chaos for a system that actually works, and yes, we’re going to laugh while doing it.
The “Chaos vs. System” Debate: Why You Need a Workflow:
Most bloggers treat writing like a lightning strike, they wait for “inspiration” to hit. Newsflash: Inspiration is a flaky friend who never shows up when the rent is due.
A workflow isn’t about being a boring robot. It’s about building a cage for your creative brain so it doesn’t wander off into a YouTube rabbit hole. By using blogging productivity hacks, you stop asking “What do I do next?” and start actually doing it.
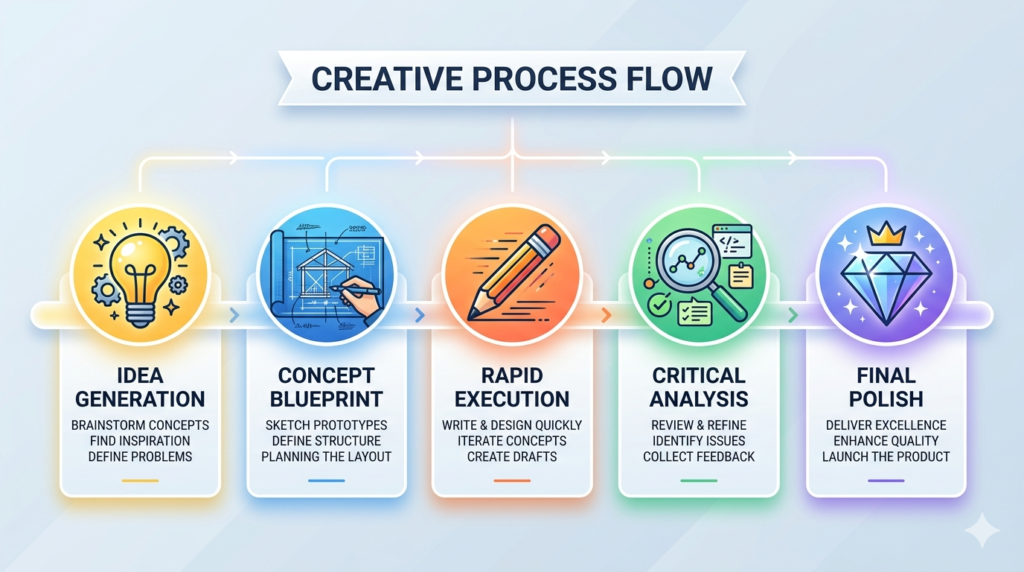
Phase 1: The Brain Dump (Ideation & Strategy):
The biggest mistake is trying to come up with an idea and write it on the same day. That’s like trying to harvest the corn the same day you plant it. You’re just going to end up with dirt in your teeth.
Keyword Research:
Before you write a single word, you need to know if anyone actually cares. Use tools to find your primary and secondary keywords. If you’re writing about “underwater basket weaving,” and only three people search for it (and two of them are your mom), maybe pivot. Content optimization starts before the draft, not after.
Using an Editorial Calendar (Because Your Brain is Full):
I used to keep my ideas on sticky notes, the back of receipts, and once, a napkin. Guess what? I lost all of them. An editorial calendar is just a fancy way of saying “a list of what I’m writing and when.” It removes the “What should I write today?” decision fatigue that kills your vibe.
Phase 2: The Skeleton (SEO Outlining):
This is where the magic happens. If the draft is the meat, the outline is the bones. Without it, your blog is just a puddle of words on the floor.
H-Tags are Your Friends:
When I started, I thought H1, H2, and H3 were types of humidifiers. They aren’t. They are the roadmap for Google’s brain. Outlining for SEO means organizing your thoughts into logical sections.
- H1: Your big, bold title.
- H2: Your main points (The “meat”).
- H3: The details (The “seasoning”).
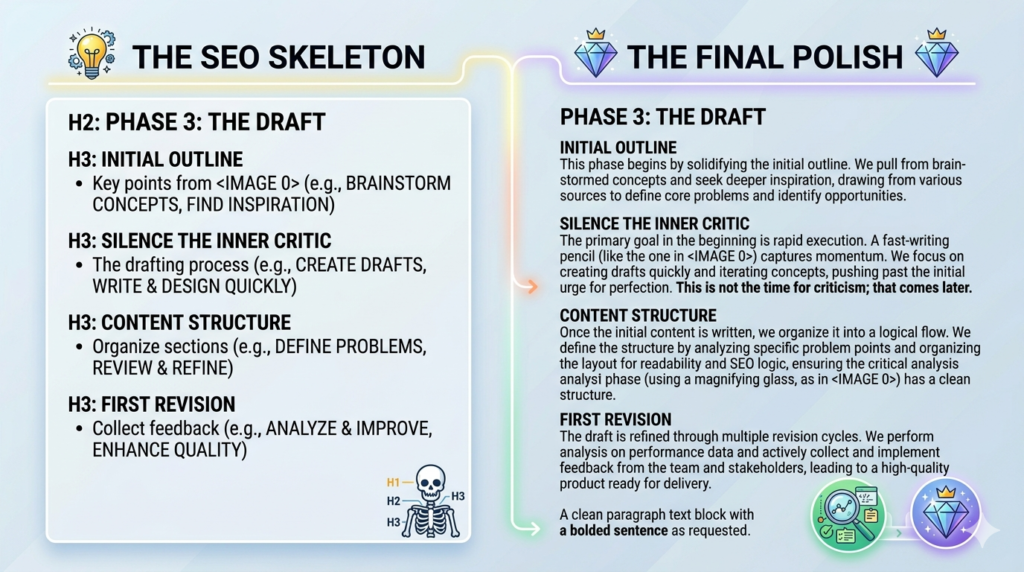
Planning for Featured Snippets:
Want to be that lucky person in the “Position Zero” box on Google? Look for questions people ask (the “People Also Ask” section) and build an H3 specifically to answer them. It’s like setting a trap for Google’s algorithm, but with helpfulness instead of cheese.
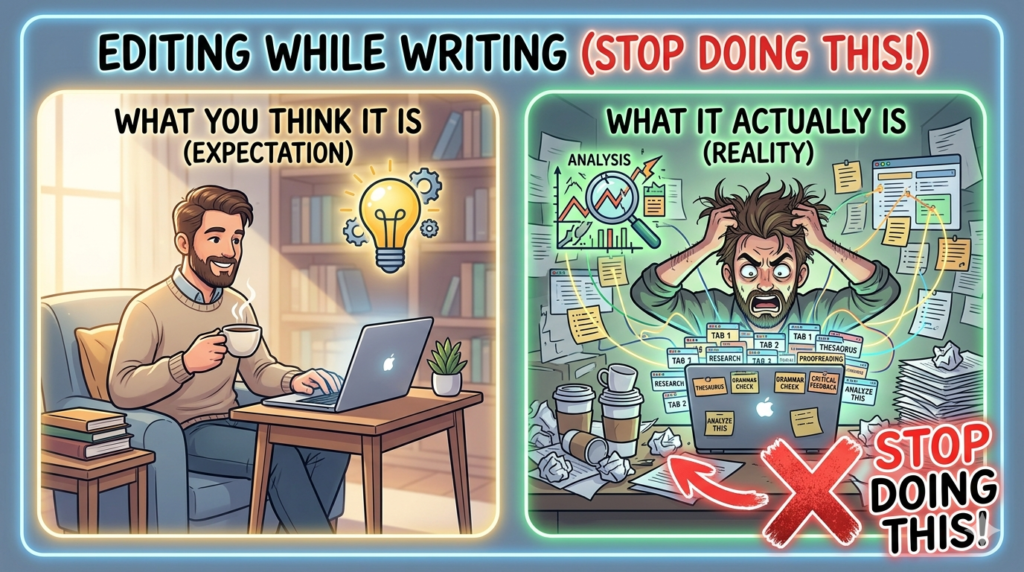
Phase 3: The “Ugly First Draft” (The Fast Write):
Here is a secret that many “experts” won’t tell you: My first drafts are absolute trash. They are filled with typos, half-finished thoughts, and the occasional “INSERT FUNNY JOKE HERE BECAUSE I’M TIRED.”
Silence the Inner Critic:
The “Fast Write” phase is about getting the words out. Do not, I repeat, DO NOT, edit while you write. That’s like trying to clean your house while the construction crew is still knocking down walls. Just keep typing. If you forget a fact, write [CHECK THIS LATER] and move on.
Productivity Hacks:
If you have the attention span of a goldfish (like me), use the Pomodoro technique. 25 minutes of intense, “shut-up-and-type” time, followed by 5 minutes of looking at pictures of capybaras. It keeps your brain fresh.
Phase 4: The Glow-Up (Editing & Optimization):
Now that you have your “word vomit” on the page, it’s time to make it look like a professional wrote it. This is where you put on your fancy editor glasses.
Cutting the Fluff:
If you can say it in 5 words, don’t use 20. Bloggers love to ramble (guilty as charged!). Go through your draft and delete every sentence that doesn’t add value. If it’s just filler to hit a word count, your readers will smell it from a mile away.
Technical SEO Check:
This is the part where you go back and add your internal links. Link to that post you wrote last month! Link to an expert! This is also when you finalize your Meta Title and Description. Remember, these are your “shop window.” If they look boring, nobody is coming inside.
Phase 5: The Final Polish (Formatting & Visuals):
Nobody wants to read a “wall of text.” It’s intimidating. It’s gross. It feels like homework.
- Bullet points: Like these!
- Bold text: To catch the eye of the skimmers.
- Short paragraphs: 2–4 sentences max. Give your readers’ eyes a place to rest.
Finally, add your images with descriptive alt-text. A funny meme or a helpful chart can keep a reader on your page for an extra two minutes, which Google absolutely loves.
Conclusion:
And there you have it. That is the content writing workflow that took me from “stressed-out amateur” to “slightly-less-stressed-out pro.” By breaking the process into Ideation, Outlining, Drafting, and Editing, you stop being overwhelmed and start being productive.
Writing is a muscle. The first time you use this workflow, it might feel a bit clunky. But keep at it, and soon you’ll be churning out high-quality, SEO-optimized gold while your competitors are still trying to figure out what a meta description is.
Call to Action: Ready to level up? Leave a comment with the weirdest place you’ve ever written a blog post idea.
FAQs:
1. Why do I need a content writing workflow?
It replaces chaos and “inspiration waits” with a system that boosts productivity and SEO results.
2. How do I start with ideation and keyword research?
Brain dump ideas into an editorial calendar and use tools to find searchable primary/secondary keywords first.
3. What’s the best way to outline for SEO?
Structure with H1 for title, H2 for main points, H3 for details, and target “People Also Ask” questions for snippets.
4. Should I edit during the first draft?
No, use “Fast Write” with Pomodoro (25-min bursts) and placeholders like [CHECK LATER] to silence your inner critic.
5. How do I optimize and polish my post?
Cut fluff, add internal links/meta details, use short paragraphs, bullets, bold text, and alt-texted images.
6. How long until this workflow feels natural? It may feel clunky at first, but consistent use turns it into a habit for churning out SEO-optimized blogs effortlessly.